Inspire 2 and Zenmuse X5S camera are true Hollywood-grade production tools that are designed with filmmakers in mind. The new CineCore 2.0 image processing system on the Inspire 2 makes the Zenmuse X5S capable of capturing 5.2K 30fps CinemaDNG video and Apple ProRes video as well as 4K 60fps using H.264 and 4K 30fps using H.265 (both at 100Mbps). When you got a DJI Inspire 2 and recorded some 4K videos with it, you may seek for a tutorial for the post workflow when dealing with Zenmuse X5S 4K H.265 footage. In this tutorial, I will share a guide on how to import DJI Zenmuse X5S 4K H.265 to Davinci Resolve for further editing. If you are in the trouble getting Zenmuse X5S 4K video to Resolve, just read on to get some hints.  Well, according to our multiple testing, we found two main basic reasons behind there. As you know Zenmuse X5S records 4K H.265 videos, but it seems Davinci Resolve (including Resolve 12.5) does not like the way. Davinci Resolve 12.5, 11 can handle (usually) 4K files without much problem, but it is extremely hardware intensive. What'more, as a new-emerging codec, H.265/HEVC is not supported by Davinci Resolve. The easy workaround to edit Zenmuse X5S 4K H.265 videos in Davinci Resolve is to convert the 4K H.265 to a more editing-friendly format for Davinci Resolve. If you're a professional users, you must know that the most suitable format is MOV which is encoded by DNxHD codec. Therefore, a Mac 4K to DNxHD Converter can be a good assistant. Overall, Dimo Video Converter Ultimate for Mac is best Video Converter for Zenmuse X5S footage. With this Zenmuse X5S H.265/4K video converter, you can effortlessly transcode Zenmuse X5S 4K H.265 to DNxHD encoded MOV, which will creat a Davinci Resolve friendly file format keeping the original quality. Besides Resolve, this software can also export DNxHD for Avid MC, Apple ProRes for Final Cut Pro, MPEG-2 for Adobe Premiere and more NLE systems for native editing. Windows uers can turn to the Windows version here. Below is the detailed guide on converting Zenmuse X5S H.265 clips to Davinci Resolve friendly videos for smoothly editing. Free Download Dimo Video Converter Ultimate for Mac/Win:
 Other Download:
Convert DJI Zenmuse X5S 4K H.265 to DNxHD for editing in Davinci Resolve 1. Load Source 4K H.265 Video Files Install and launch the 4K Video Converter on your Mac. Then, press the "Add File" button to add 4K H.265 video file from Zenmuse X5S into the program.
Other Download:
Convert DJI Zenmuse X5S 4K H.265 to DNxHD for editing in Davinci Resolve 1. Load Source 4K H.265 Video Files Install and launch the 4K Video Converter on your Mac. Then, press the "Add File" button to add 4K H.265 video file from Zenmuse X5S into the program.  2. Set Output Format Hit "Select Format" bar to select output format. You can choose "Format > Editor" and choose Avid Media Composer as output format. It is an ideal editing format for Resolve. 3. 4K Video Settings Click "Settings" button if you'd like to customize advanced audio and video parameters like Video Codec, aspect ratio, bit rate, frame rate, Audio codec, sample rate, audio channels. Here you are recommended to set the video size as 1920*1080 to realize 4K to 1080p compressing for Davinci Resolve, which can't support raw 4K video well.
  4. Start Conversion After confirming everything is alright, click the "Start" button on the bottom right to launch the conversion. Since 4K video file is usually very large, please be more patient for the conversion. Thereafter, import, play and edit Zenmuse X5S 4K H.265 videos in DaVinci Resolve 12/11/10/9 freely! After editing, you can freely share edited videos on your iPhone/iPad/Android devices or TV with Dimo free Media Server as you like. Related Software: BDmate (Mac/Win) Lossless backup Blu-ray to MKV with all audio and subtitle tracks; Rip Blu-ray to multi-track MP4; Convert Blu-ray to almost all popular video/audio formats and devices; Copy Blu-ray to ISO/M2TS; Share digitized Blu-ray wirelessly. DVDmate (Mac/Win) A professional DVD ripping and editing tool with strong ability to remove DVD protection, transcode DVD to any video and audio format, and edit DVD to create personal movie. 8K Player (Mac/Win) A mixture of free HD/4K video player, music player, Blu-ray/DVD player, video recorder and gif maker. Free Download or Purchase Dimo Video Converter Ultimate for Mac/Win:
 Contact us or leave a message at Facebook if you have any issues. Related Articles:
Source: How to Convert 3D MKV to SBS 3D MP4 on Mac/Windows
Contact us or leave a message at Facebook if you have any issues. Related Articles:
Source: How to Convert 3D MKV to SBS 3D MP4 on Mac/Windows
With the introduction of Google Daydream, Google's VR division finally showed the world what Google's vision for VR is and perhaps where we can expect VR to go. Daydream introduces a 'VR mode' to the Android operating system and enables to get more sustained VR performance via their Android phone. A pairable remote you hold in your hand (similar to the Oculus Remote) controls the action. If you've some 3D Blu-rays that you would love to watch in Google DayDream View, you've come to the right place. In this article, you will learn how to rip 3D Blu-ray to DayDream View compatible 3D videos for watching via Android phone conveniently.  As far as we know, the DayDream View lacks ability to play 3D Blu-ray movies, and it requires either Side-by-Side MP4 video using a VR player. 3D Blu-ray in general acts on the principle of alternating frames for each eye, although there are several methods that can be used. For example, odd-numbered frames might be for the left eye whereas even-numbered frames are for the right eye. Side-by-side 3D means taking each frame, compressing them horizontally, and fitting them in a single frame. This results in the separate left-eye/right-eye 1920×1080 frames becoming two individual 960×1080 images inside the same frame. When you look at these, you can actually see the 3D composite if you use the "relaxed eyes" method. In this case, we will quickly walk you through how to rip a 3D Blu-ray to Side-by-side 3D file type which is friendly with DayDream View, so you can view 3D Blu-ray movies with Google DayDream View in 3D effects. To finish task, here we recommended you to try a 3D Blu-ray ripping program - Dimo Video Converter Ultimate. With it, you can legally remove copy protection from commercial 3D Blu-ray and effortlessly rip a frame packed movie from 3D Blu-ray disc and Blu-ray movie folder and output SBS 3D MP4 videos supported by Google DayDream with best quality easily. In addition, this 3D Blu-ray ripping tool also helps you to change 3D Blu-ray 3D MP4/MOV/MKV for many glasses or VR headsets on the market, like AirVR, VR One, Gear VR, Google Cardboard, HTC Vive, Oculus Rift, etc.. Besides 3D Blu-ray, 2D Blu-ray, DVD, 2D/3D videos to Daydream View conversion is allowed. If you're using a Mac, please turn to Dimo Video Converter Ultimate for Mac, which allows you to convert 3D Blu-ray to Google DayDream View on Mac (OS Sierra included). Now download the right version according to your situation and check out the steps below. Free Download Dimo Video Converter Ultimate:
 Other Download:
How to convert 3D Blu-ray to watch in Google DayDream View Step 1. Import 3D Blu-ray movie Launch the professional 3D Blu-ray to DayDream View converter. Click "Add Blu-ray" button to add 3D Blu-ray movie to it. Double click the video, you can preview the movie in the right side.
Other Download:
How to convert 3D Blu-ray to watch in Google DayDream View Step 1. Import 3D Blu-ray movie Launch the professional 3D Blu-ray to DayDream View converter. Click "Add Blu-ray" button to add 3D Blu-ray movie to it. Double click the video, you can preview the movie in the right side. 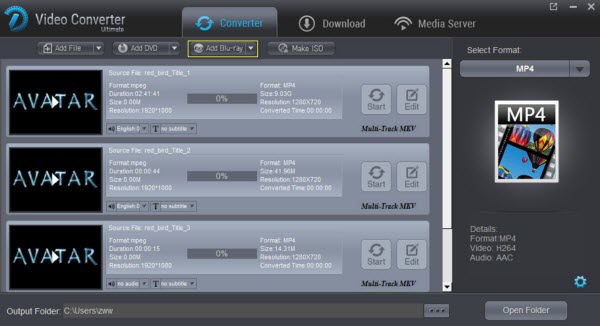 Step 2. Select an output format for DayDream View Click "Select Format" and find "Format > Video". there are a lot of format options for you. Here you can recommended to select MP4 as the output format. Tip: Click Settings to adjust the parameters like video codec, video bitrate, video frame rate, audio sample rate, audio channel. 1920x1080 compressed side-by-side 3D should be resampled to 1920x540 resolution full side-by-side resolution. And keep audio in AAC or MP3. Step 3. Set 3D mode Dimo 3D Blu-ray video Converter offers optimized 3D Blu-ray vdeo editing functions, empowering user to crop video file size, trim video segment, add special effect/watermark and so on to realize different needs.
 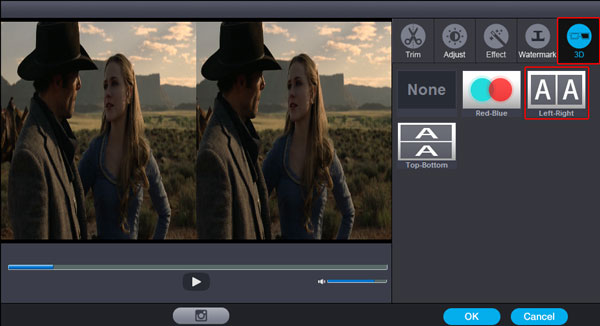 Step 4. Start to convert 3D Blu-ray to DayDream View Click "Start" button, 3D Blu-ray to Google DayDream View converter will start to work. Just be patient, it will not take you long time. After the conversion, click "Open" to get output SBS video fortransferring to VR player to get better access. It is right time to play and enjoy your 3D Blu-ray on DayDream View anytime, anywhere for hours. To have a wonderful 3D home theatre experience, this conversion is just the first procedure. You need extra VR Player to view locally-saved 360 and VR videos onto DayDream View via Android as below: Installation First, you need to install the video player app, launch Play Store, then search for "Kolor Eyes" or browse to Kolor Eyes Play Store page. Once on the app page, click on the install button. Compatibility Any Android device running Android 4.x and later. Media compatibility Kolor Eyes is able to play any video that your device natively supports. Video format, resolution and bit rate depends on device model. Safe choice is h.264 encoded 1280x720 at 30 FPS (level 3.1). Most modern high-end devices play h.264 encoded 1920x1080 30 FPS video (level 4.1). Latest high-end models reach 4k resolution 3840x2160 at 30 FPS (level 5.1). A quick test to determine if a video is playable in Kolor Eyes is to try to play it with the native Videos app. Transport Local videos This screen exposes user movies downloaded using a URL (DOWNLOAD FILE menu. Downloading a file creates KolorEyes folder) or uploaded to the device directly. To upload a video locally, connect your device to your computer, then just upload your movies to the folder \Movies\KolorEyes\. If a video is greyed, Kolor Eyes is not able to play it. And the above top 3D video converter- Dimo Video Converter Ultimate is needed. Free Download or Purchase Dimo Video Converter Ultimate:
 Feel free to contact us if you have any issues. Related Articles:
Source:How to Convert MKV to iPad for Playback on Apple iPad Using MKV to iPad Converter?
Feel free to contact us if you have any issues. Related Articles:
Source:How to Convert MKV to iPad for Playback on Apple iPad Using MKV to iPad Converter?
With Panasonic, the longest-standing television manufacturers that has been at the forefront of TV design for many years, and its impressive television models, including plasma, Viera TV, LED, LCD, OLED, and 4K TVs, you can enjoy all kind of media files on Panasonic television. However, when you tried to add some kinds of MP4 videos to Panasonic TV for enjoyment via USB flash drive, you may fail to do the job. So, what's the problem? How to solve "Panasonic TV not playing MP4" issue? Read on detailed solutions.  Why Panasonic TV won't play MP4 files? To play all kinds of MP4 on Panasonic TV, you need to choose corresponding preferred codec for your TV model. From Panasonic TV official website we know that Panasonic TV is only compatible with MP4 in H.264/MPEG-4 AVC video codec and AAC audio codec. However, MP4 is a container format which contains various kinds of video and audio codecs. Once the MP4 files can't meet the requirement of Panasonic TV input format and codec, you'll get into trouble to play MP4 in Panasonic TV. Besides this, there are some other possible reasons: * The damaged MP4 Video content will not play correctly on Panasonic TV * When you play MP4 video on Panasonic TV over a network connection, the video may not be played smoothly. * If the Index Table is in error, the Seek (Jump) function is not supported. Best Workaround to Solve Panasonic TV Won't Play MP4 There is no better way to watch MP4 on Panasonic TV than to convert MP4 to Panasonic TV compatible formats like MP4 and MKV. Thankfully, there are quite a lot of web-based video converter applications available specifically for people to convert media files. It's recommended to use Dimo Video Converter Ultimate to do conversion. It is ensured that this tool will enable you to:
- Convert all kinds of video and audio types including 2D/3D MP4, SD/HD/4K MP4, H.264/H.265 MP4, AVI, MKV, FLV, MPG/MPEG, WMV, MOV, FLAC, WMA, etc.
- World's fastest speed to convert MP4 to Panasonic TV, thanks to the NVIDIA CUDA hardware acceleration tech
- Directly accomplish MP4 to Panasonic TV conversion preset profiles for TV
- Trim, crop, rotate videos, add effect/watermark, create 3D to meet your needs.
- Adjust the parameters of video and audio files.
- Free share videos from computer in common formats to mobile devices or TV wirelessly
- Perfectly compatible with Windows PC, no matter the latest Windows 10, 8.1 or earlier ones
If you're a Mac user, simply turn to Dimo Video Converter Ultimate for Mac, which has the same function as the Windows version. Now download the program according to your computer system and follow the simple guide below to get incompatible MP4 files to play on Panasonic TV nicely. Free Download Dimo Video Converter Ultimate (Win/Mac): Other Download:
Guide: Convert and play MP4 video on Panasonic TV Step 1: Add MP4 files Install and launch the MP4 file converter, and then click "Add File" button to import your .mp4 to the software one by one.  Step 2: Set output video format Click "Select Format" bar and select "Device > TVS > Panasonic TV" video as target format. The optimized output format will contains the best video settings for playback on your anasonic TV. Tip: This top MP4 to Panasonic TV Converter enables you to modify the output parameters. You can click the Settings icon and adjust the video bitrate, codec, frame rate, audio sample rate, etc parameters. Step 3: Start MP4 to Panasonic TV conversion Hit the "Start" button; this video converter will start to convert MP4 to Panasonic TV for playback. After the conversion, click "Open" in the main interface to locate the output videos.Then it would be easy to transfer and play MP4 files on Panasonic TV via USB, DLNA, WLAN or Dimo Media Server below.
 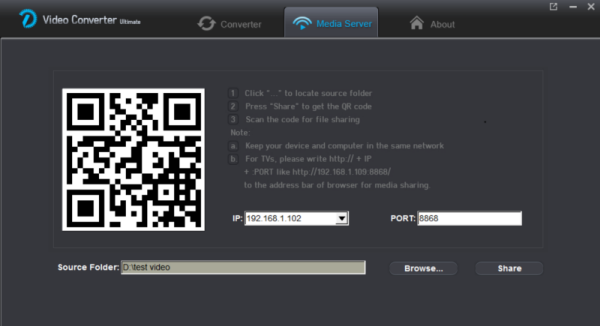 1- Network connection: Make sure that the PC/Mac and Panasonic TV are connected to the same home Wi-Fi. 2- Open Dimo Video Converter Ultimate and click "Media Server" tab. 3- Click on "Browse" button to choose the location which store your source movies. 4- Click "Share" to begin sharing local videos to Panasonic TV. Don't close the free Media Server for Dimo. 5- Open the browser on Panasonic TV and input the website URL "http://IP:PORT" like "http://192.168.1.109:8868/" (without quotation marks) into the address bar. 6- The loaded video source will be listed and you can now play converted MP4 movies on your Panasonic TV. The Panasonic TV MP4 support issue has been excellently solved. Then just enjoy your life in front of the home theater. Free Download or Purchase Dimo Video Converter Ultimate: Need the lifetime version to work on 2-4 PCs so that your friends and family can instantly broaden their entertainment options? Please refer to the family license here.
  Kindly Note: The price of Dimo Video Converter Ultimate for Windows is divided into 1 Year Subscription, Lifetime/Family/Business License: $43.95/Year; $45.95/lifetime license; $95.95/family license(2-4 PCs); $189.95/business pack(5-8 PCs). Get your needed one at purchase page. Contact us or leave a message at Facebook if you have any issues. Related Articles:
Source:Some MP4 Files Not Playing on Panasonic TV
Kindly Note: The price of Dimo Video Converter Ultimate for Windows is divided into 1 Year Subscription, Lifetime/Family/Business License: $43.95/Year; $45.95/lifetime license; $95.95/family license(2-4 PCs); $189.95/business pack(5-8 PCs). Get your needed one at purchase page. Contact us or leave a message at Facebook if you have any issues. Related Articles:
Source:Some MP4 Files Not Playing on Panasonic TV
Nowadays, MP4 file is widely known to all because it is supported by various portable media devices. While, how about the compatibility of MP4 files to Non-Linear Editing systems? In this article, we aim to outline the MP4 and Sony Vegas compatibility. If you are facing any relevant issues, read on to get the quick fix. Hot Search: Free MP4 download sites | Free MP4 Editors  Why Sony Vegas not support MP4 files? Although Sony Vegas announced that it can deal with a wide variety of video files including MP4, people still encounter many problems when importing MP4 to Sony Vegas Pro for further video editing. You may say: since MP4 is said to be supported, why Sony Vegas doesn't accept my MP4 files? In fact, the native import of some flavors of MP4 wasn't supported until Vegas 10. In addition, based on our testing, some MP4 files will import into Vegas Pro without QuickTime perfectly, whereas other MP4 files absolutely require QuickTime. The reason of the error mostly lays in the video format codec parameters. Since MP4 is a container instead of a codec, if the MP4 contains a video codec that Sony Vegas can't recognize, for instance, H.265, Sony Vegas Pro (including Vegas 14) won't accept it. What's the available workflow for getting Sony Vegas and MP4 movies to play nicely? ? To get MP4 and Sony Vegas to play nicely, you need to convert MP4 to Sony Vegas friendly format like MOV, MPEG-2, MMV, etc. first. To transcode MP4 files to Sony Vegas, you're recommended to use Dimo Video Converter Ultimate. It supports creating high quality WMV video for your Sony Vegas, no matter what's the format of your source video files. What's more, it also supports various formats of videos to seamlessly fit Sony Movie Studio Platinum, Adobe Premiere, Avid Media Composer, Windows Movie Maker, Pinnacle Studio, etc. editing softwares. Below is a step-by-step guide on converting MP4 video to Sony Vegas compatible formats. Free Download Dimo Video Converter Ultimate (Win/Mac): Other Download:
How to import MP4 files into Sony Vegas Step 1: Load original MP4 files Click "Add File" button on the main interface to load your MP4 files once you set up the professional MP4 Converter on your PC. (Drag & Drop function is another way to import the videos.)
Why Sony Vegas not support MP4 files? Although Sony Vegas announced that it can deal with a wide variety of video files including MP4, people still encounter many problems when importing MP4 to Sony Vegas Pro for further video editing. You may say: since MP4 is said to be supported, why Sony Vegas doesn't accept my MP4 files? In fact, the native import of some flavors of MP4 wasn't supported until Vegas 10. In addition, based on our testing, some MP4 files will import into Vegas Pro without QuickTime perfectly, whereas other MP4 files absolutely require QuickTime. The reason of the error mostly lays in the video format codec parameters. Since MP4 is a container instead of a codec, if the MP4 contains a video codec that Sony Vegas can't recognize, for instance, H.265, Sony Vegas Pro (including Vegas 14) won't accept it. What's the available workflow for getting Sony Vegas and MP4 movies to play nicely? ? To get MP4 and Sony Vegas to play nicely, you need to convert MP4 to Sony Vegas friendly format like MOV, MPEG-2, MMV, etc. first. To transcode MP4 files to Sony Vegas, you're recommended to use Dimo Video Converter Ultimate. It supports creating high quality WMV video for your Sony Vegas, no matter what's the format of your source video files. What's more, it also supports various formats of videos to seamlessly fit Sony Movie Studio Platinum, Adobe Premiere, Avid Media Composer, Windows Movie Maker, Pinnacle Studio, etc. editing softwares. Below is a step-by-step guide on converting MP4 video to Sony Vegas compatible formats. Free Download Dimo Video Converter Ultimate (Win/Mac): Other Download:
How to import MP4 files into Sony Vegas Step 1: Load original MP4 files Click "Add File" button on the main interface to load your MP4 files once you set up the professional MP4 Converter on your PC. (Drag & Drop function is another way to import the videos.) 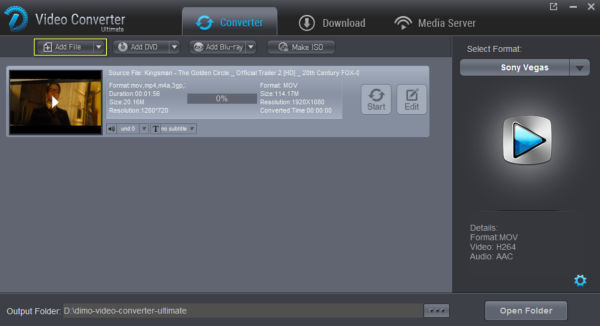 Step 2: Select output format Click "Select Format" column to choose output format. For Sony Vegas editing, "Editor > Sony Vegas" is one of the best compatible video formats for you to choose. Tips: By clicking the Settings button beside Profile, you can adjust the output video/audio resolution, frame rate, bit rate, etc. to customize the output files to get the best quality you want.
 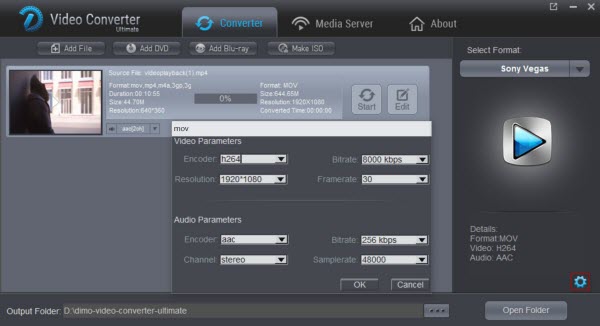 Step 3: Start MP4 to Sony Vegas Conversion Tap the "Start" button on the main interface to start transcoding or compressing MP4 to Sony Vegas. When finished, the output file is ready for being imported to Sony Vegas for editing. All Vegas versions are supported, including Vegas Pro 14/13/12. Alternative Solution: Install the K Lite Codec Pack Note: We found people blaming the codec saying K-Lite is that it blindly installs all kinds of components (not just codecs), many of which are not compatible with each other. And it does not uninstall cleanly. If don't want to install a pile of codecs on your PC, try the first approach above. Free Download or Purchase Dimo Video Converter Ultimate: Need the lifetime version to work on 2-4 PCs so that your friends and family can instantly broaden their entertainment options? Please refer to the family license here. Kindly Note: The price of Dimo Video Converter Ultimate for Windows is divided into 1 Year Subscription, Lifetime/Family/Business License: $43.95/Year; $45.95/lifetime license; $95.95/family license(2-4 PCs); $189.95/business pack(5-8 PCs). Get your needed one at purchase page. Related Software: BDmate (Win/Mac) Lossless backup Blu-ray to MKV with all audio and subtitle tracks; Rip Blu-ray to multi-track MP4; ConvertBlu-ray to almost all popular video/audio formats and devices; Copy Blu-ray to ISO/M2TS; Share digitized Blu-ray wirelessly. DVDmate (Win/Mac) A professional DVD ripping and editing tool with strong ability to remove DVD protection, transcode DVD to any video and audio format, and edit DVD to create personal movie. Videomate (Win/Mac) An all-around video converter software program that enables you to convert various video and audio files to formats that are supported by most multimedia devices. 8K Player (Win/Mac) A mixture of free HD/4K video player, music player, Blu-ray/DVD player, video recorder and gif maker. Contact us or leave a message at Facebook if you have any issues. Related Articles:
Source:Lossless Backup/Copy DVD for Viewing on Sony KD-49XE9005 TV
Step 3: Start MP4 to Sony Vegas Conversion Tap the "Start" button on the main interface to start transcoding or compressing MP4 to Sony Vegas. When finished, the output file is ready for being imported to Sony Vegas for editing. All Vegas versions are supported, including Vegas Pro 14/13/12. Alternative Solution: Install the K Lite Codec Pack Note: We found people blaming the codec saying K-Lite is that it blindly installs all kinds of components (not just codecs), many of which are not compatible with each other. And it does not uninstall cleanly. If don't want to install a pile of codecs on your PC, try the first approach above. Free Download or Purchase Dimo Video Converter Ultimate: Need the lifetime version to work on 2-4 PCs so that your friends and family can instantly broaden their entertainment options? Please refer to the family license here. Kindly Note: The price of Dimo Video Converter Ultimate for Windows is divided into 1 Year Subscription, Lifetime/Family/Business License: $43.95/Year; $45.95/lifetime license; $95.95/family license(2-4 PCs); $189.95/business pack(5-8 PCs). Get your needed one at purchase page. Related Software: BDmate (Win/Mac) Lossless backup Blu-ray to MKV with all audio and subtitle tracks; Rip Blu-ray to multi-track MP4; ConvertBlu-ray to almost all popular video/audio formats and devices; Copy Blu-ray to ISO/M2TS; Share digitized Blu-ray wirelessly. DVDmate (Win/Mac) A professional DVD ripping and editing tool with strong ability to remove DVD protection, transcode DVD to any video and audio format, and edit DVD to create personal movie. Videomate (Win/Mac) An all-around video converter software program that enables you to convert various video and audio files to formats that are supported by most multimedia devices. 8K Player (Win/Mac) A mixture of free HD/4K video player, music player, Blu-ray/DVD player, video recorder and gif maker. Contact us or leave a message at Facebook if you have any issues. Related Articles:
Source:Lossless Backup/Copy DVD for Viewing on Sony KD-49XE9005 TV